This video explains how to create and use scales in Moodle

This video explains how to create and use scales in Moodle
This video provides an example of using a rubric in Moodle
Brief explanation of making rubrics in Moodle
Like all of it’s other features in Moodle, the quiz module has so many options as to make it difficult to use. In this post, we are going to look at providing feedback to students for their participation in a quiz.
In the example used in this post, we are going to use a quiz that was already developed in a prior post as the example for this blogpost.
The first step is to click on “edit settings” to display all of the various options available for the quiz. Once there, you want to scroll down to “review options”. After doing this you will see the following

As you can see, there are four columns and under each column there are 7 choices. The columns are about the timing of the feedback. Feedback can happen immediately after an attempt, it can happen after the student finishes the quix but is still available for others to take, or it can happen after everyone has taken the quiz and the quiz is no longer available.
Which type of timing you pick depends on your goals. If the quiz is for learning and not for assessment perhaps “immediately after the attempt” is best. However, if this is a formal summative assessment it might be better to provide feedback after the quiz is closed.
The options under each column are the same. By clicking on the question mark you can get a better explanation of what it is.
Overall Feedback
One important feedback feature is “Overall Feedback”. This tells the student a general idea of their understanding. You can set it up so that different overall feedback is given based on their score. Below is a screen shot of overall feedback

In the example, the first boundary is for scores of 100 and above and the second boundary is for scores 1-99. Students who get 100 know they are OK while students with less than 100 will get a different feedback. You have to add boundaries manually. Also, remember to add the percent sign after the number
General Feedback and Specific Feedbackfor a Question
General feedback for a question is the feedback a person gets regardless of their answer. To find this option you need to either create a question or edit a questions.
Specific feedback depends on the answer they pick. Below is a visual of both general and specific feedback.

Below is an example of the feedback a student would get taking the example quiz in this post. In the picture below, the student got the question wrong and received the feedback for an incorrect response.

Conclusion
The quiz module is a great way to achieve many different forms of assessment online. Whether the assessment is formative or summative the quiz module is one option. However, due to the complex nature of Moodle it is important that a teacher knows exactly what they want before attempting to use the quiz module.
In this post, we will look at how to setup a quiz through importing questions from the question bank. Quizzes can serve many different functions within Moodle depending on the goals and objectives of the instructor.
After logging into Moodle and selecting a class that you are a teacher in. You need to click on “activity and resources” and click on “quiz”. You should see the following screen.

Give your quiz a name. Below there are many different options that are very confusing for people new to Moodle. Below are some brief explanations.
Obviously the options are staggeringly confusing. Before trying to make a quiz it is always important to determine exactly what you want the students to do and the role the assignment plays in achieving this. For the example in this post, we want to make a quiz that assesses the students understanding of some content. As such, here are the options used in Moodle to achieve this
Once the setting are determined you click “save and display” and you will see the following.

Now click “edit quiz” and you will see the image below
We will now add questions. The questions we will add were created in a prior post. To do this click “add” and select “from question bank”. From there, select as many questions as you want and click “add questions to the quiz.” You will see the following

In a future post, we will learn about providing feedback for quizzes.
Conclusion
Quizzes provide a way for teacher to determine the progress of their students. This post provide some basic insights into setting up a quiz in Moodle.
One of Moodle’s many features is the quiz activity, which allows a teacher to assess a student’s knowledge in a variety of ways. However, before developing a quiz, a teacher needs to have questions developed and ready to be incorporated into the quiz.
The purpose of this post is to explain how to develop questions that are available to be used in a quiz.
Make a Category
When making questions it is important to be organized and this involves making categories in which to put your questions. To do this you need to click on course administrator|questions bank|Categories. After doing this you will see something similar to the image below.

You want to click add category and type a name for your category. In the picture below we named the category “example”. When you are finished click “add category and you will see the following.

Finding the Question Bank
Now that we have a question category we need to go to the question bank. To do so click on course administrator|question bank. You should see something similar to the following.

Select the “example” category you made and then “click create new question.” You should see the following.

As you can see, there are many different forms of questions available. The type of questions you should ask depends on many factors. For now, we will make a true or false example question. Once you select the option for T/F question you will see the following.

The question name is for identifying the question in the bank and not on the quiz. Therefore, avoid calling your questions “question 1, 2,3 etc.” because if you have multiply quizzes you will not know which question one to take from your bank. You need to develop some sort of cataloging system for your questions such as the following
This means the following
How you do this is your own decision and this is just an example.
The other boxes on this page are self-explanatory. General feedback is what the student receives whether they are right or wrong. The other feedback is given depending on the response. After making a question selecting if it is true or false you will see the following.

In a future post, we will learn how to take questions from the question bank and incorporate them into an actually quiz.

A key concept in teaching and learning is the idea of distributed practice. Distributed practice is a process in which the teacher deliberately arranges for their students to practice a skill or use knowledge in many learning sessions that are short in length and distributed over time.
The purpose behind employing distributed practice is to allow for the reinforcement of the material in the student’s mind through experiencing the content several times. In this post, we will look at pros and cons of distributed practice as well as practical applications of this teaching technique
Pros and Cons
Distributed practice helps to maintain student motivation through requiring short spans of attention and motivation. For most students, it is difficult to study anything for long periods of time. Through constant review and exposure, students become familiar with the content.
Another benefit is the prevention of mental and physical fatigue. This is related to the first point. Fatigue interferes with information processing. Therefore, a strategy that reduces fatigue can help in students’ learning new material.
However, there are times when short intense sessions are not enough to achieving mastery. Project learning may be one example. When completing a project, it often requires several long stretches of completing tasks that are not conducive to distributed practice.
Application Examples
When using distributed practice it is important to remember to keep the length of the practice short. This maintains motivation. In addition, the time between sessions should initial be short as well and lengthen as mastery develops. If the practice sessions are too far a part, students will forget.
Lastly, the skill should be practiced over and over for a long period of time. How long depends on the circumstances. The point is that distributed practice takes a commitment to returning to a concept the students need to master over a long stretch of time.
One of the most practical examples of distributed practice may be in any curriculum that employs a spiral approach. A spiral curriculum is one in which key ideas are visited over and over through a year or even over several years of curriculum.
For our purposes, distributed practice is perhaps a spiral approach employed within a unit plan or over the course of a semester. This can be done in many ways such as.
The primary goal should be to employ several different activities that require students to return to the same material from different perspectives.
Conclusions
Distributed practice is a key teaching technique that many teachers employ even if they are not familiar with the term. Students cannot see any idea or skill once. There must be exposed several times in order to develop mastery of the skill. As such, understanding how to distribute practice is important for student learning.
As with all the features in Moodle, there are many different ways to mark an assignment. In this post we will explain several different approaches that can be taken to marking an assignment in Moodle. For information on setting up an assignment see the post on how to do this.
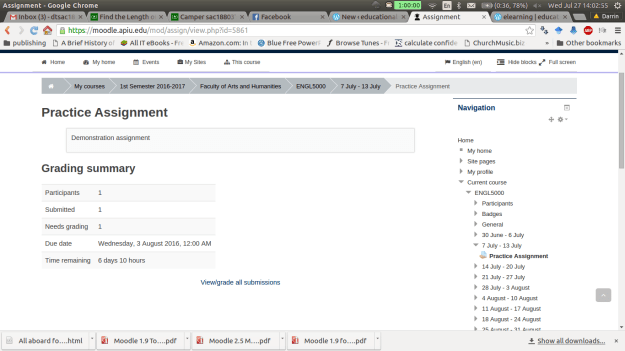
Below is a screen shot of a demo class for this post. To beginning marking an assignment, you need to click on the assignment while in the role of a teacher.
After clicking on the assignment you will see a
Underneath all this information is a link for viewing submissions and you need to click on this. Below is a visual of this.
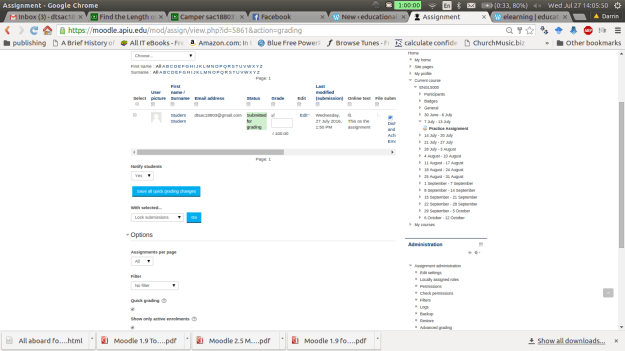
On the next page there is a lot of information. For “grading action” we don’t want to change this option for now. The next section has the names of the students who have submitted the assignment. The “grade” box allows you to submit a numerical grade for the assignment. The “online text” box is only available if you want the students to type a response into Moodle. The “file submission” link allows you to download any attachments the students uploaded. If any comments have been made by the student or someone else you can see those in the “comments” section. The “feedback comments” allows you to inform the student privately how they did on the assignment.
The other options are self-explanatory. Please note that this example uses the quick grading option which is useful if you are the only one marking assignments in the class. Below is a visual of this page.
Once you put in a score and at feedback (feedback is optional). You must click on “save all quick grading changes”. The student now has a grade with feedback on the assignment. As the teacher, you can view the students overall grade by going to the “grading action” drop down menu and clicking on “View gradebook” You will see the following.

You can also change grades here by clicking on the assignment. This will take you “grading summary page” which is the second screenshot in this post. If you click on the pencil you can override an existing grade as shown in the screen below. It will take you to the following screen.

Click on override and you can change the grade or feedback. Click on exclude and the assignment will not be a part of the final grade.
Conclusion
In this post we explored some of the options for grading assignments in Moodle. This is not an inherently technical task but you should be aware of the different ways that it can be done to avoiding becoming confused when trying to use Moodle.
In this post, we are going to take a closer look at setting up the gradebook in Moodle. In particular we are going to learn how to setup categories and graded items in. For many, the gradebook in Moodle is very confusing and hard to understand. However, with some basic explanation the gradebook can become understandable and actually highly valuable.
Finding the Setup Page
After logging into Moodle and selecting a course in which you are the teacher, you need to do the following.

The folder “ENGL 5000 Experimental course” is the name of the class that I am using. Your folder should have the name of your class in this place. When you create categories and grade items they should all be inside this folder.
Making Categories
It makes sense to create categories first so that we have a place to put various graded items. How you setup the categories is up to you. One thing to keep in mind is that you can create sub-categories, sub-sub categories, etc. This can get really confusing so it is suggested that you only make main categories for simplicity sake unless there is a compelling reason not to do this. In this example, we will create 4 main categories and they are
To make a category click on “Add category” and you will see the following.

Repeat what we did for the “classwork” category for each of the other categories in the example. Below are screenshots of the categories
QUIZZES Category

TEST CATEGORY

FINAL CATEGORY

If everything went well you should see the following on the setup page.

Notice how the class is now worth 100 points. You can make your categories worth whatever you want. However, it becomes difficult to interpret the scores when you do anything. As educators, we are already use to a 100 point system so you may as well use that in Moodle as well even though you have the flexibility to make it whatever you want.
There is one more step we need to take in order to make sure the gradebook calculates grades correctly. You may have noticed that each of our categories are worth a different number of points. Therefore, we must tell Moodle to weigh these categories differently. Otherwise the results of each category will have the same weight on the overall grade. To fix this problem do the following.
You should see the following

Notice in the course total that it now says “simple weighted mean of grades”.
For adding graded items, you do the following
Below is an example of a quiz I put in the quiz category. This is what the setup page should look like if this is down correctly

As you can see, quiz 1 is worth ten points. You may wonder how quiz 1 can be worth 10 points when the entire category is only worth 20. Remember, Moodle use statistics to condense the score of the quiz to fit within the 20 points of the category.
Conclusion
This post exposed you to the basics of setting up categories and graded items in Moodle. The main problem with the gradebook is the flexibility it provides. With some sort of a predefined criteria it is easy to get confused in using it. However, with the information provided here, you now have a foundation for using the Moodle gradebook.
In assessment, there are two categories that most test items fall into which are direct and indirect test items. Direct test items ask the student to complete some sort of authentic action. Indirect test items measure a students knowledge about a subject. This post will provide examples of test items that are either direct or indirect items.
Direct Test Items
Direct test items used authentic assessment approaches. Examples in TESOL would include the following…
The primary goal of direct test items is to be as much like real-life as possible. Often, direct testing items are integrative, which means that the student has to apply several skills at once. For example, presentations involve more than just speaking but also the writing of the speech, the reading or memorizing of the speech as well as the critical thinking skills to develop the speech.
Indirect Test Items
Indirect test items assess knowledge without authentic application. Below are some common examples of indirect test items.
Multiple Choice
Multiple choice questions involve the use of a question followed by several potential answers. It is the job of the student to determine what is the most appropriate answer. Some challenges with writing multiple choice are the difficulty of writing incorrect choices. For every correct answer, you need several wrong ones. Another problem is that with training, students can learn how to improve their success on multiple choice test without having a stronger knowledge of the subject matter.
Cloze Items
Cloze items involve giving the student a paragraph or sentence with one or more blanks in it that the student has to complete. One problem with Cloze items is that more than one answer may be acceptable for a blank. This can lead to a great deal of confusion when marking the test.
Paraphrasing
Paraphrasing is strictly for TESOL and involves having the student rewrite a sentence in a slightly different way as the example below.
“I’m sorry I did not go to the assembly”
I wish________________________________
In the example above the student needs to write the sentence in quotes starting with the phrase “I wish.” The challenging is determining if the paraphrase is reasonable as this is highly subjective.
Sentence Re-Ordering
In this item for TESOL assessment, a student is given a sentence that is out of order and they have to arrange the words so that an understandable sentence is developed. This one way to assess knowledge of syntax. The challenge is that for complex sentences more than one answer may be possible
It is important to remember that all indirect items can be integrative or discrete-point. Unlike integrative, discrete point only measures one narrow aspect of knowledge at a time.
Conclusion
A combination of direct and indirect test items would probably best ensure that a teacher is assessing students so that they have success. What mixture of the two to use always depends on the context and needs of the students.

Validity is often seen as a close companion of reliability. Validity is the assessment of the evidence that indicates that an instrument is measuring what it claims to measure. An instrument can be highly reliable (consistent in measuring something) yet lack validity. For example, an instrument may reliably measure motivation but not valid in measuring income. The problem is that an instrument that measures motivation would not measure income appropriately.
In general, there are several ways to measure validity, which includes the following.
Content Validity
Content validity is perhaps the easiest way to assess validity. In this approach, the instrument is given to several experts who assess the appropriateness or validity of the instrument. Based on their feedback, a determination of the validity is determined.
Response Process Validity
In this approach, the respondents to an instrument are interviewed to see if they considered the instrument to be valid. Another approach is to compare the responses of different respondents for the same items on the instrument. High validity is determined by the consistency of the responses among the respondents.
Criterion-Related Evidence of Validity
This form of validity involves measuring the same variable with two different instruments. The instrument can be administered over time (predictive validity) or simultaneously (concurrent validity). The results are then analyzed by finding the correlation between the two instruments. The stronger the correlation implies the stronger validity of both instruments.
Consequence Testing Validity
This form of validity looks at what happened to the environment after an instrument was administered. An example of this would be improved learning due to test. Since the the students are studying harder it can be inferred that this is due to the test they just experienced.
Face Validity
Face validity is the perception that the students have that a test measures what it is supposed to measure. This form of validity cannot be tested empirically. However, it should not be ignored. Students may dislike assessment but they know if a test is testing what the teacher tried to teach them.
Conclusion
Validity plays an important role in the development of instruments in quantitative research. Which form of validity to use to assess the instrument depends on the researcher and the context that he or she is facing.

In quantitative research, reliability measures an instruments stability and consistency. In simpler terms, reliability is how well an instrument is able to measure something repeatedly. There are several factors that can influence reliability. Some of the factors include unclear questions/statements, poor test administration procedures, and even the participants in the study.
In this post, we will look at different ways that a researcher can assess the reliability of an instrument. In particular, we will look at the following ways of measuring reliability…
Test-Retest Reliability
Test-retest reliability assesses the reliability of an instrument by comparing results from several samples over time. A researcher will administer the instrument at two different times to the same participants. The researcher then analyzes the data and looks for a correlation between the results of the two different administrations of the instrument. in general, a correlation above about 0.6 is considered evidence of reasonable reliability of an instrument.
One major drawback of this approach is that often given the same instrument to the same people a second time influences the results of the second administration. It is important that a researcher is aware of this as it indicates that test-retest reliability is not foolproof.
Alternative Forms Reliability
Alternative forms reliability involves the use of two different instruments that measure the same thing. The two different instruments are given to the same sample. The data from the two instruments are analyzed by calculating the correlation between them. Again, a correlation around 0.6 or higher is considered as an indication of reliability.
The major problem with this is that it is difficult to find two instruments that really measure the same thing. Often scales may claim to measure the same concept but they may both have different operational definitions of the concept.
Kuder-Richardson Split Half Test
The Kuder-Richardson test involves the reliability of categorical variables. In this approach, an instrument is cut in half and the correlation is found between the two halves of the instrument. This approach looks at internal consistency of the items of an instrument.
Coefficient Alpha
Another approach that looks at internal consistency is the Coefficient Alpha. This approach involves administering an instrument and analyze the Cronbach Alpha. Most statistical programs can calculate this number. Normally, scores above 0.7 indicate adequate reliability. The coefficient alpha can only be used for continuous variables like Lickert scales
Conclusion
Assessing reliability is important when conducting research. The approaches discussed here are among the most common. Which approach is best depends on the circumstances of the study that is being conducted.

Testing is done for many different reasons in various fields such as education, business, and even government. There are many motivations that people have for using evaluation. In this post, we will look at four reasons that testing is done. The five reasons are…
For Placement
Placement test serves the purpose of determining at what level a student should be placed. There are often given at the beginning of a student’s learning experience at an institution, often before taking any classes. Normally, the test will consist of specific subject knowledge that a student needs to know in order to have success at a certain level.
For Diagnoses
Diagnostic tests are for identifying weaknesses or learning problems. There similar to a doctor looking over a patient and trying to diagnose the patient’s health problem. Diagnostic test help in identifying gaps in knowledge and help a teacher to know what they need to do to help their students.
For Assessing Progress
Progress tests are used to assess how the students are doing in comparison to the goals and objectives of the curriculum. At the university level, these are the mid-terms and final exams that students take. How well the students are able to achieve the objects of the course is measured by progress test.
For Determining Proficiency
Testing for proficiency provides a snapshot of the student is able to do right now. They do not provide a sign of weaknesses like diagnoses nor do they assess progress in comparison to a curriculum like progress test. Common examples of this type of test are used to determine admission into a program such as the SAT, MCAT, or GRE.
For Providing Evidence of Proficiency
Sometimes, people are not satisfied with traditional means of evaluation. For them, they want to see what the student can do by having the student through examining the student’s performance over several assignments over the course of a semester. This form of assessment provides a way of having students produce work that demonstrates improvement in the classroom.
One of the most common forms of assessment that provides evidence of proficiency is the portfolio. In this approach, the students collect assignments that they have done over the course of the semester to submit. The teacher is able to see how the progress as he sees the students’ improvement over time. Such evidence is harder to track through using tests.
Conclusions
How to assess is best left for the teacher to decide. However, teachers need options that they can use when determining how to assess their students. The examples provided here give teachers ideas on what can assessment they can use in various situations.

Marking papers and providing feedback is always a chore. However, nothing seems to be more challenging in teaching then providing feedback for written work. There are so many things that can go wrong when students write. Furthermore, the mistakes made are often totally unique to each student. This makes it challenging to try and solve problems by teaching all the students at once. Feedback for writing must often be tailor-made for each student. Doing this for a small class is doable but few have the luxury of teaching a handful of students.
Despite the challenge, there are several practical ways to streamline the experience of providing feedback for papers. Some ideas include the following
Structuring the Response
A response to a student should include the following two points
The response should be short and sweet. No more than a few sentences. It is not necessary to report every flaw to the student. Rather, point out the majors and deal with other problems later.
If it is too hard to try and explain what went wrong sometimes providing an example of a rewritten paragraph from the student’s paper is enough to give feedback. The student compares your writing with their own to see what needs to be done.
Training Students
Students need to know what you want. This means that clear communication about expectations saves time on providing feedback. Providing rubrics is one way of lessen a teacher’s workload. Students see the expectations for the grade they want and target those expectations accordingly. The rubric also helps the teacher to be more consistent in marking papers and providing feedback.
Peer-evaluation is another tool for saving time. Students are more likely to think about what they are doing when hearing it from peers. In addition, students can find some of the smaller problems, such as grammar, so that the teacher can focus on shaping the ideas of the paper. Depending on the maturity of the students, it is better to let them look at it before you invest any energy in providing feedback.
What’s Your Purpose
Many teachers will mark papers and try to catch everything every single time. This means that they are looking at the flow of the paragraph, the connection of the main ideas, will also catch typos and grammatical mistakes. This approach is often overwhelming and extremely time-consuming. In addition, it is discouraging to students who receive papers that are covered in red.
Another approach is what is called selective marking. Selective marking is when a teacher focuses only on specific issues in a paper. For example, a teacher might only focus on paragraph organization for a first draft and focus on the overall flow of the paper later. With this focus, the teacher and students can handle similar issues at the same time that are much more defined than checking everything at once.
Personally, I believe it is best to focus on macro issues such as paragraph organization and overall consistency first before focusing on grammatical issues. If the ideas are going in the right direction it is easy to spot grammar issues. In addition, if the students know English well, most grammar issues are irritating rather than completely crippling in understanding the thrust of the paper. However, perfect grammar without a thesis is a hopeless paper.
Conclusion
There is no reason to overwork ourselves in marking papers. Basic adjustments in strategy can lead to students who are provided feedback without a teacher over doing it.

Students are in school to learn. We learn most efficiently when we make mistakes. Understanding how students make mistakes and the various types of mistakes that can happen can help teachers to provide feedback.
Julian Edge describes three types of mistakes
It is the last two as a teacher that we are most concern. Helping students with errors and providing assistance with attempts is critical to the development of student learning.
Assessing Students
Students need to know at least two things whenever they are given feedback
Positive feedback provides students with an understanding of what they have mastered. Whatever they did correctly are things they do not need to worry about for now. Knowing this helps students to focus on their growth areas.
Constructive feedback indicates to students what they need to work. It is not enough to tell students what is wrong. A teacher should also provide suggests on how to deal with the mistakes. The suggestions for improvement become the standard by which the student is judged in the future.
For example, if a student is writing an essay and is struggling with passive voice the teacher indicates what the problem is. After this, the teacher provides suggestions or even examples of switching from passive to active voice. Whenever the essay is submitted again the teacher looks for improvement in this particular area of the assignment.
Ways of Giving Feedback
Below are some ways to provide feedback to students
Mistakes are what students do. It is the teacher’s responsibility to turn mistakes into learning opportunities. This can happen through careful feedback the encourages growth and not discouragement.

Assessment is focused on determining a students’ progress as related to academics. In this post, we will examine several types of assessment common in education today. The types we will look at are
Direct Observation
Direct observation are instances in which a teacher watches a student to see if learning has occurred. For example, a parent that has instructed a child in how
to tie their shoe will watch the child doing this. When successful, as observed, the parent is assured that learning has occurred. If the child is not successful the parent knows to provide some form of intervention, such as reteaching, to help the child to have success.
Problems with direct observation include the issue of only being able to focus on what is seen. There is no way of knowing what is going on in the child’s mind. Another challenge is that just because the behavior is not observed does not mean that no learning has happened. Students can understand, at times, with being able to perform.
Written Response
Written response is the assessing of a student’s response in writing. These can take the form of test quizzes, homework, and more. The teacher reads the student’s response and determines if there is adequate evidence to indicate that learning has happened. Appropriate answers indicate evidence of learning
In terms of problems, written responses can be a problem for students who lack writing skills. This is especially true for ESL students. In addition, writing takes substantial thinking skills that some students may not possess.
Oral Responses
Oral responses involve a student responding verbally to a question or sharing their opinion. Again issues with language can be a barrier along with difficulties with expressing and articulating one’s opinion. Culturally, mean parts of the world do not encourage students to express themselves verbally. This puts some students at a disadvantage when this form of assessment is employed.
For teachers leading a discussion, it is often critical that they develop methods for rephrasing student comments as well as strategies for developing thinking skills through the use of questions.
Rating by Others
Rating by others can involve teachers, parents, administrators, peers, etc. These individuals assess the performance of a student and provide feedback. The advantages of this include having multiple perspectives on students progress. Every individual has their own biases but when several people assess such threats to validity are reduced.
Problems with rating by others includes finding people who have the time to come and watch a particular student. Another issue is training the raters to assess appropriately. As such, though this is an excellent method, it is often difficult to use.
Conclusion
The tools mentioned in this post are intended to help people new to teaching to see different options in assessment. When assessing students, multiple approaches are often the best. The provide a fuller picture of what the student can do. Therefore, when looking to assess students consider several different approaches to verify that learning has occurred.

One type of assessment that has been popular a long time is the portfolio. A portfolio is usually a collection of student work over a period of time. There are five common steps to developing student portfolios. These steps are
The student needs to understand the point of the portfolio experience. This helps in creating relevance for the student as well as enhancing the authenticity of the experience. Common reasons for developing portfolios include the following…
The teacher and the students need to determine what skills will the portfolio provide evidence for. Common skills that portfolios provide evidence for are the following
This step has to do with deciding on who will set the course for the overall development of the portfolio. At times, it is the student who has complete authority to determine what to include in a portfolio. At other times, it is the student and the teacher working together. Sometimes, even parents provide input into this process.
The evidence provides must support the skills mention in step two. Depending on who has the power to select evidence, they still may need support in determining if the evidence they selected is appropriate. Regardless, of the requirement, the student needs a sense of ownership in the portfolio.
The teacher needs to develop a rubric for the purpose of grading the student. The teacher needs to explain what they want to see as well as what the various degrees of quality are.
Conclusion
Portfolios are a useful tool for helping students in assessing their own work. Such a project helps in developing a deeper understanding of what is happening in the classroom. Teachers need to determine for themselves when portfolios are appropriate for their students.

In this post, we conclude our discussion on grading systems by looking at less common approaches. There are at least three other approaches to grading. These systems are comparison with aptitude, comparison with effort, and comparison with improvement.
Comparison with Aptitude
In this approach, a student is compared with their own potential. In other words, the teacher grades the student on whether or not the student is reaching their full potential on an assignment as determined by the teacher. For example, if an average student does average work, they get an “A.” However, if an excellent student does average work they get a “C”. To get an “A”, the excellent student must do excellent work as determined by the teacher.
The advantage of this system is everyone, regardless of ability, has a chance at earning high grades. However, the disadvantages are serious. The teacher gets to decide what potential a student has. If the teacher is wrong, weak students are pushed too hard, strong students may not be pushed hard enough, and or vice versa. This grading is also unfair to stronger students as weaker students earn the same grade for inferior work.
Comparison with Effort
This approach does not look at potential as much as it looks at how hard a student works. To receive a higher grade an average student must demonstrate a great deal of effort on a test. For the strong student, if they show little effort on an assessment they will receive a lower grade.
This system has the same advantages and disadvantages of the aptitude system. It is unfair to the stronger students to be held to a different standard in comparison to their peers. Also, it is hard to be objective when determining the amount of effort a student puts forth.
Comparison with Improvement
This system of grading looks at the progress a student makes over time to assign a grade. Students who improve the most will receive the highest grade. Students who show little improvement will not do so well.
This system is more objective than the previous two examples because it relies on data collected over time that is more than a teacher’s impression. However, one significant drawback is the student who does well from the beginning. If a student is strong from the beginning there will be little improvement. Committing to this grading system could hurt high-performing students.
Conclusion
Which system to use depends on the context and needs of your students. The number rule for grading is to maintain consistency within one assessment but it is perhaps okay to flexible from one assignment to the next.

After the students submit their exams and they have been marked by you, it is time to determine the grades. This can actually be very controversial as there are different grading systems. In this discussion, we will look at two of the most common grading systems and examine their advantages and disadvantages. The grading systems discussed in this blog are comparison with other students and comparison with a standard.
Comparison with Students
Comparison with students is the process of comparing the results of one student with the results of another student. Another term for this is “grading on the curve.” For example, if a test is worth 100 points and the highest score is 85, the total points possible would be reduce to 85. The removal of 15 points raises the grade of all of the students significantly because the standard is the 85 of the highest performing student rather than the absolute value of 100.
Students, particularly the average and low performing ones, love this approach. The reason for this is that they get a boost in their grade without having to demonstrate any further evidence of proficiency in meeting the objectives. Teachers often appreciate this method as well, as it helps students and reduces the pressure of having to fail individuals or give students low grades.
A drawback to this approach is the pressure it places on high-performing students. The good students face pressure to not study as much in order to have a lower grade that benefits the group. Students also have a way of finding out who got the highest score and this can lead to social problems for stronger students.
One way to avoid the pressure on the top student is specify a percentage of students who will receive a certain grade. For example, the top 10% of students will receive an “A” the next 10% of students will receive a “B” and so on. This makes the top performers a group of students rather than an individual. However, student performance becomes categorical rather than continuous, which some may claim is not accurate.
A question to ask yourself when determining the appropriateness of “grading on a curve” is the context of the subject. It may be okay for someone with an 85 to get an “A” in philosophy. However, do you want a heart doctor operating on you who earned an “A” by earning an 85 or a heart doctor who earned an “A” by scoring a 100? Sometimes this difference is significant.
Comparison with a Standard
Comparison with a standard is comparing students to a specific criteria such as the ABCDF system. Each letter is assigned a percentage out of a hundred and the grade is determined from this. For example, using a traditional grading scale, a student with a “94” would receive an A.
The advantage of this system is the objectivity of the grading system (marking is highly subjective, especially for essay items). Either student received an 94 or they did not. There is no subjective curve. Those who received a high grade truly earned it while those who received a low grade deserved it.
One problem is that different places can use different scales. For example, an “A” in many US Universities is normally 90% and above. However, an “A” in Thailand universities is set at only 80%. Both are seen as “excellent” students. This makes comparisons of students difficult. Using the doctor analogy, who do you want to perform heart surgery on you the 80% “A” doctor or the 90% “A” doctor?
Conclusion
In the next post, we will look at lesser known grading systems that will provide alternatives for teachers searching for ways to help their students. If you have any suggestion or ways of dealing with grading, please share this information in the comments.

In the last post, there was a discussion on developing essay items. This post will provide ideas on when to use essay items, how to write essay items, and ways to mark essay items.
When to Use Essays
Here are several reasons to know when essays may be appropriate. Of Course, this is not an exhaustive list but it will provide a framework for you to make your own decision.
How to Write Essay Items
One of clearest way to write essay items is to approach them the same way as writing objectives. This means that for the most part essay items should include.
Below is an example
Within Southeast Asia, predict which country will have the strongest economic growth over the next 20 years. You will be assessed upon the clarity, content, organization, and depth of thinking of your response. Your response should be 1,000-1,500 words.
Here are the three components in parentheses
Within Southeast Asia (condition), predict which country will have the strongest economic growth over the next 20 years (action). You will be assessed upon the clarity, content, organization, and depth of thinking of your response (proficiency). Your response should be 1,000-1,500 words.
Here are some other tips
Marking Essay Items
The criteria for grading should be a part of the essay item and falls under the proficiency component. These same traits in the proficiency component should be a part of a rubric the teacher uses to mark the assignment. Rubrics help with grading consistently. The details of making rubrics are the topic of another post.
The ideas here are just an introduction to making essay items. There is always other and better ways to approach a problem. If you have other ideas please share in the comments section.

Essay items are questions that require the student to supply and develop the correct answer. This is different from objective items in which the options are provided and the student selects from among them. Essay items focus upon higher level thinking in comparison to the lower level thinking focus of objective items. There are two common types of essay items and they are the long response essay and the limited response essay.
Long Response Essay
The long response essay is a complex essay of several or more paragraphs that addresses a challenging question that requires deep thinking. An example of a long response essay item is below.
Compare and contrast Ancient Egypt and Ancient Mesopotamia. Consider the geographic, economic, social, and military approaches. Your response will be graded upon accuracy, depth of thinking, organization, and clarity.
Such a question as the one above requires significant critical thinking in order to identify how these two nations were similar and how they were different. There are an infinite number of potential answers and approaches. A distinct trait of essay items is the potential for so many equally acceptable solutions. Success is determined by the quality of the response rather than in finding one correct answer.
Limited Response Essay
Limited response essays items require a student to recall information in an organized way in order to address a specific problem. The length of the response may be a paragraph or two and the answer does not have the same depth as long response. One reason the answers are shorter and simpler is because these types of questions may only address one issue per item. Long response essay items will deal with several issues in each item. Below is an example of a limited response item.
Explain two differences between Ancient Egypt and Ancient Mesopotamia.
The answer to this question could easily be supplied in a short paragraph. The student list two differences and they should receive full credit. If you compare this item to the long response item you can see the difference in difficulty. One difference is there is no criteria on how the student will be graded. The assumptions are listing two differences is enough for full credit. Another difference is the expectations. The long response wanted several comparisons and contrasts while the limited response only required to short contrast.
In the next post, we will discuss when to use essay items, give suggestions for their development, and ideas for marking.

Multiple choice items are probably the most popular objective item that is used for tests. The advantage of multiple-choice items in comparison to true and false and matching is that multiple choice can assess higher levels of thinking. In other words, multiple choice items can go beyond recall and deal with matters such as application and justification
There are two components to a multiple choice item. The statement or question of the multiple choice item is called the stem. The answer choices are called options. There are usually four or five options per stem for multiple choice items.
Below are some tips for developing multiple choice items
Stem Clues
A stem clue is when the words in the stem are similar to the words in the options. This similarity serves as a signal for sharp students. Consider the example…
When the Israelites were in Canaan, which of the following was a threat to them?
A. Canaanites
B. Indians
C. Americans
D. Spanish
The word Canaan is in the stem and the word Canaanites is one of the options and most students would rightly guess it is the correct answer.
Grammatical Clues
Sometimes grammar can give the answer away. Take a look at the example.
Steve Jobs was an____________.
A. Lawyer
B. Doctor
C. Entrepreneur
D. Movie Star
The give away here is the indefinite article “an” in the stem. Only the option “entrepreneur” can be correct grammatically.
Unequal Option Lengths
The longest answer is often the correct answer for whatever reason. I do not think this requires an example.
Other Uses of Multiple Choice
Multiple choice can also be used for higher level thinking. For example, in mathematics a teacher writes a word problem and provides several options as potential answer. The student must calculate the correct answer on a separate piece of paper and then select the correct answer on the test.
For geography, a teacher can provide a map and have students answer multiple choice items about the map. Students must use the map to find the answers. These are just some of many ways that multiple choice items can go beyond recall
Tips and Conclusion
Here are some simple tips for improving multiple choice items
There is much more that can be said about this topic. However, for those new to developing multiple choice items the information provided will serve as starting point for developing your own way of developing test items.

Today we will continue our discussing on developing excellent test items by looking at how to write matching items. Matching test items involved two columns. The side to the left has the descriptions (or they should) and the side to the right has terms. Below is an example
Directions: Column A contains descriptions of various famous basketball players. Column B contains the names of several famous basketball players. After examining both columns select the basketball who matches each description. Each answer can be used only once.
Column A Column B
I know the answers are scattered. Formatting is difficult in wordpress sometimes
This example has several strong points.

Developing matching items with these concepts in mind will help students to have success in the examinations you give them. Are there other strategies for matching? If so, please share in the comments section

In developing assessments, there are two types of test items. The two types of test items are objective test items and essay test items. Objective test items are items that only have one correct answer. Examples include true and false, multiple choice, matching, and completion.
Essay items are items that can have many different answers. There are two common types and they are restricted response and extended essay. With either of these items the student response to an open-ended question.
In this post, we are going to take a closer look at true and false items by defining and providing information on how to develop them.
True and False Items
True and false items are easy to make. You write a statement and you ask the student if the statement is true or not. In comparison to other test items, true and false items can be made quickly. However, there are some concerns with their use.
One problem with true and false items is that a student who guesses has a 50% chance of success. This means on average, that a student who knows nothing could get 50% on a true and false test if all they did was guess. Even though they failed, this is a high grade for someone who knows nothing.
One way to deal with this is that when a student identifies that a statement is false, they also need to indicate what aspect of the statement is incorrect. Below is an example.
Directions: For each statement below read the statement and place a check next to true if the statement is true or next to false if the statement is false. If the statement is false, underline the word in the statement that is false and write the correct word in the space provided.
T F Thailand is south of Malaysia
______________
In the example above, the answer is false. Therefore, we will put a check next to F. Next, we have to determine what word in the statement is incorrect. In this example, the word “south” is wrong” Thailand is north of Malaysia. Therefore, we underline south and write the word north in the space provided. Are completed example is below.
T F√ Thailand is south of Malaysia
North
This approach helps to reduce the risk of random guessing by students. Now they have to know why an answer is false in order to receive full credit. The only problem with this is that if the answer is true and the student guesses correctly, there is no way of knowing. Below are some suggestions for developing true and false items
Tips for True and False Items
We hope that these ideas help you in developing true and false statements. If you have other suggestions, please include them in the comments.

Developing assessments is often difficult. Teachers wonder if they have covered all the material, they have to think about how to assess the students, and they need to consider reaching them at different levels of thinking. This is not in anyway easy for most teachers.
One way to deal with these problems is through the use of what is called a test blueprint. A test blueprint is a map of the objectives that are assessed on the test as well as a map of the different levels of learning that each question addresses. Below is an example. You can click on the image to make it bigger.

The example above is a test on curriculum development. There are four objectives that are assessed on this test and they are.
These four objectives are assessed at one of three levels of Bloom’s taxonomy. These levels are
For these test, I am looking at how my students perform these four objectives at the knowledge, comprehension, and application levels of Bloom’s Taxonomy.
For each level of Bloom’s Taxonomy, I asked 1 or 2 questions related to my objectives. This number is then totaled at the far right. For example, for objective one, developing aims from needs assessment, I have 1 true and false question at the knowledge level, 1 multiple choice question at the comprehension level, and one long essay question at the application level. This gives me a total of 3 questions that focus for the “developing aims from the needs assessment objective.”
These three questions for objective 1 represent 15% of the total questions on the test. In other words, not only do I know how many questions I asked in each level for this objective, I also know how much of the total test is represented in my first objective. This helps in maintaining a balanced test as sometimes teachers give too much weight to one specific piece of information.
Not only can you know how many questions you ask about each objective, you can also know how many questions you have for each level of Bloom’s taxonomy. For example, looking at the chart, you can see that there are 6 knowledge questions which represent 30% of the total questions on this exam. Again, such information helps in maintaining a balanced exam.
At the very bottom of the chart, you can also find out how many of each type of question you asked on the exam. For example, there are 6 True and false questions and 8 multiple choice questions for a percentage of 30% and 40% of the total questions. This also helps with balance. You can make sure that different forms of questions are an appropriate percentage of the total exam.
The test blueprint helps teachers to develop balance exams. Objectives, question type, and the level of the questions can all be taken into account when developing an assessment.


