
Advertisements
Below is a video that explains the options available in the assignment activity in Moodle


Below is a video that explains the options available in the assignment activity in Moodle
Below is a simple and brief video on how to create assignments in Moodle

In a prior post, we looked at how to make groups manually in Moodle. In this post, we will look at two additional features in making groups and they are
Making Auto-Groups
Auto-groups allows you to have Moodle make groups based on a criteria you give it. If the characteristics of the groups doesn’t matter that is a fast convenient way to put students in groups. Below are the steps

2. Click on Auto-Create Groups and you will see the following

3. The page is mostly self explanatory. Groups can be formed based on the number of groups you want or the number of people per group. Group formation can also be limited by role in the class or by last name, ID, etc. Before groups are finalized you can use the preview button to look at the potential groups. Below is an example of a completed group formation

The auto-group feature made 12 groups and the names of the members are listed in the table. Once you are satisfied you click submit and return to the previous page

Using Groupings
Groupings allows you to place several groups into a “grouping” this allows you to add several groups to an activity at once. In order to use groupings you must first make groups which we have already done. Just like with the group feature in which the same person can be a member of several groups so can one group be a member of several groupings. Below are the steps to making groupings

2. Click on create grouping and you will see the following

3. We will give the grouping a name and click save changes and this will send you to the previous page shown below

4. To add a group to the grouping, you need to click on the people icon under the edit column and you will see the following

5. Now we will pick several groups to add to our grouping and click add as shown below

6. When you are done adding groups you click on back to groupings to finish the process as shown below

Conclusion
We now know how to make groups manually and automatically. We also know how to create groupings. However we have not yet learn how to actually using groups and or groupings in Moodle learning experiences. This will be a topic of a future post
For those of us who are not tech-savvy, the idea of making a database can sound very intimidating. However, a database is not as mysterious or difficult to create as you may think.
A database is strictly is just an organized way of collecting and storing records. If you ever made a list of your CD or book collection this is in many ways a highly simplified database.
Moodle allows a teacher to create a database to allow students to upload and or share information for whatever purpose. The secret to developing a database is to know what information you want it to store. After this, you just select the fields in Moodle to complete the database.
This post will explain how to develop a database in Moodle based on particular needs. We will make a database that stores information about Asian food.


3. After clicking “save and display” you will be taken to the next page where you add the fields you want. The fields are simply the different forms of information you want the database to store. There are 12 of them as listed below and next to each is a description of how we will use them in the example

We will now use all twelve in making a database
4. First, we will create a date field so the student can indicate when they tried the food. To do this click on the drop down box to add a new field . Type in the information and click “add”.

5.We will now make a text input. This is a single line of space for inputting text. In this field, the students will be able to put the name of the Asian food. There are also two options for making this field required and to autolink it throughout the course. Below is a visual

6. The picture field allows the students to upload a picture. For us, we want to be able to see the food that the students eat. You can set the options if you desire for the size of the picture

7. We will now create a menu field. This field will allow the student to indicate one of several options. For our example, the student will select if the meal was for breakfast, lunch, or dinner. In the options, you must put one choice per line

8. We will use the number field to indicate the level of spiciness of the food

9. The multimenu allows you to select several options at once. For our example, we want to know who eats this type of food foreigner, local, or both.

10. The checkbox field allows for multiple choices to be selected. For our example, we want to know where the food is prepared.

11. The radio button allows a person to make a single choice. For example, we want the students recommendation about the food

12. The text area allows for anything to be added. It is also possible to determine the size of this box. For us, we want to allow the student to share additional comments about the food.

13. The file field allows for attachments. We are going to have the students upload the recipe of the food.

14. The url field allows for a link. For the example, the students will put a website that explains more about the food

15. Lastly, the Latlong field allows for the inclusion of location. You have to indicate the external map services you want to use. For our example, we are asking for the location where the student ate the food.

16. After completing the various fields, you need to click on “templates’ in order to set the template.

Below are two more pictures, the first picture shows what an empty entry looks like. This can be accessed by clicking on “add entry”. The second picture is a picture of a completed entry. This can be seen be clicking on “view single”


Conclusion
This post explain how to create databases in Moodle. All that is required is an idea of what exactly you want the students to input. From there, clicking on several different fields is not to complicated for any teacher. The benefit of the database is that it is a highly structured way of collecting data. This is useful for students who require a greater degree of support.
The attendance module in Moodle is yet another excellent tool for learning management. Unlike other Moodle modules, the attendance feature is still simplistic and is surprisingly simple to setup. With this module you can do some of the following.
This post will provide a step-by-step procedure for setting up the attendance module in Moodle.
1. Log in to Moodle, select the course, and turn editing on
2. Click “add activity” select “attendance” and click “add”


4. Click “add session” and complete the following
a. Start date of the semester
b. Time of the class
c. Check the box “Repeat the session above as follows” because we want to use the attendance module more than once
d. Check the boxes for the days the class is held
e. Make sure class repeats every 1 week if this is how your class works
f. For “repeat until” select the last day of the semester
g. Click “add”
h. NOTE: You can have multiple sessions in a day if you repeat these steps. This is valuable for teachers who see the same students several times in a day.


The next step is for customizing the features of your attendance. The example below is from one school but you can modify the settings however you want
6. Click on settings
a. Delete the “excused” column as it is not applicable in our example school
b. Change the number of points for being present from 2 to 1
c. Change the value of late from 1 to 0.65
* The school’s policy is 3 tardies is one absence
* Students should lose 1/3 of a point for be late or about 0.33
* When this happens three times it is the equivalent of losing a full point
* 1/3 + 1/3 + 1/3 = 1 absence

7. Click on “sessions” and take attendance by finding the day you want and clicking on the green circle


You can view attendance on individual days by selecting any of the following

a. Go to “reports”
b. Off to the right hand size are check boxes select the student(s) you want to send a message to
c. Click “send message” in the lower left of the screen
d. Enter your message and click “send message”


Conclusion
The attendance module provides teachers and administrators with a tool to see how students are doing not only in their class but across the campus. This assumes that everyone uses it. As such, modules such as the attendance module in Moodle requires support of all the teachers in order to reach full functionality.
One of Moodle’s many features is the quiz activity, which allows a teacher to assess a student’s knowledge in a variety of ways. However, before developing a quiz, a teacher needs to have questions developed and ready to be incorporated into the quiz.
The purpose of this post is to explain how to develop questions that are available to be used in a quiz.
Make a Category
When making questions it is important to be organized and this involves making categories in which to put your questions. To do this you need to click on course administrator|questions bank|Categories. After doing this you will see something similar to the image below.

You want to click add category and type a name for your category. In the picture below we named the category “example”. When you are finished click “add category and you will see the following.

Finding the Question Bank
Now that we have a question category we need to go to the question bank. To do so click on course administrator|question bank. You should see something similar to the following.

Select the “example” category you made and then “click create new question.” You should see the following.

As you can see, there are many different forms of questions available. The type of questions you should ask depends on many factors. For now, we will make a true or false example question. Once you select the option for T/F question you will see the following.

The question name is for identifying the question in the bank and not on the quiz. Therefore, avoid calling your questions “question 1, 2,3 etc.” because if you have multiply quizzes you will not know which question one to take from your bank. You need to develop some sort of cataloging system for your questions such as the following
This means the following
How you do this is your own decision and this is just an example.
The other boxes on this page are self-explanatory. General feedback is what the student receives whether they are right or wrong. The other feedback is given depending on the response. After making a question selecting if it is true or false you will see the following.

In a future post, we will learn how to take questions from the question bank and incorporate them into an actually quiz.
The lesson module in Moodle provides a way for a teacher to share content in an interactive way through the use pages that provide text and questions at the discretion of the teacher.
This post will provide basic information on how to setup and deliver content through a lesson.
Planning a Lesson
Lessons take a lot of planning. You have to determine what you want you students to do while also deciding how they will navigate through the lesson. This is not easy. For our example, we are going to have a brief lesson on two theories in education (perennialism and essentialism. Below is an outline of the structure of the lesson.
Types of Pages in a Lesson
There are several types of pages you can use in a lesson there are explained as the following.
In our sample lesson, we have the following types of pages
Below are the steps for setting up a lesson


Welcome to the lesson on Theories in Education. Click on the button perennialism to learn about this theory.
5. You need to scroll down and find the “content 1” box. In the “description” type “perennialism and set the jump to the next page as shown in the picture below. Then click save page

When you click “save page” you should see the web page below

Under the heading actions select “add content page”. In the new page call it “perennialism”. You can give a brief definition of perennialism. In addition, you can add a video on perennialism as my example did. Under “content 1” type “essentialism” and have this page jump to the next page. Below is what the page should look like.

We now repeat this process for the “essentialism page” The only difference is that for “content 1” we will have this page jump to a page called “summary questions”. Below is a visual of this step

The final page we need to create is a question page. This allows us to assess student understanding of the lesson. On the home page for the lesson under “action” after the “essentialism” page select “question. This is shown in the picture below.

On the next page select “Essay” as shown below

You can now give the page a name and ask whatever question you want. Make sure you set the jump to “end of lesson” and you can also determine how many points the question is worth. Below is my example.

You can see how your lesson looks using the “preview” tab. After your students have completed the lesson you can click on the grade essays tab to mark the essays. Below is an example.

The reports tab give you the results for all students.
Conclusion
The lesson module is a great feature in Moodle. It is important to keep lessons short, focused and lively in order to keep student motivated. The only limit to a lesson is your own imagination and the ability to plan systematically. As progress in elearning continues lessons may be replaced in the near future with the development of authoring tools and other forms of interactive content.
The chat activity in Moodle provides students with the opportunity to communicate with each other in real-time. This is an example of of synchronous learning, which is the traditional mode of learning found in classrooms. Students, through collaboration, are learning together in time.
In this post, we will look at how to setup a chat as well as some suggestions on the use of the chat activity in an online course.
Setting Up Chat

2. In the next screen, you need to give your chat a name. Adding a description is optional. In the “chat session” section you can schedule when the chat takes places. You can also indicate if you want this chat session to be regularly schedule with the “Repeat/publish sessions” if you leave it on the default setting, students can join the chat room anytime. There is also an option for saving past chats and whether students can view past chats. Below is a screenshot of the features.

3. The actual chat room is simple to use. After clicking on “Save and display” the next screen will have a link called “click here to enter chat now”. When you do this, you will see the following.

4. The people who are in the chat room are displayed to your right. To type a message click on the empty box next to the “send” button, type your message, and press enter. Below is a sample message between the teacher and a student.

5. When you log in to chat the previous messages are gone. This is different from facebook which saves everything as a never-ending dialog. To see what was said in the past you need to click on the link “view past chat sessions” and then select the conversation you want to read. Below are two pictures, the first shows the link for viewing past chat session and the second shows a list of sessions to read


Suggestions for Using Chat
Conclusion
The chat activity is an excellent tool for coming into direct contact with students. This tool can be used to stimulate real-time discussion or for other means. When using chat be aware of the strengths and limitations and this will help in providing an excellent learning experience for the students.
The forum module in moodle is a highly versatile tool available for a teacher’s use. For beginners in particular, the forum module can be used to delivery and teach all content. For this reason alone, it is wise for newbies to moodle to focus on using forums and to add additional tools that are more efficient for specific task later.
In this post, we will look at how to deploy forums as your one-all tool for someone who is using Moodle for the first time.
Using Forums for Everything
Below is a brief list of how forums can be used in multiple ways. The list below includes how the forum is used and the more efficient tool that could be used if the teacher is familiar with it. If there is no tool that is more efficient than the column is left blank.
| Task | Better Way |
|---|---|
| Discussion | |
| Download course outline | file resource |
| Links to various websites | link resource, book, or page |
| submit assignments | Assignment activity |
| Quiz | Quiz activity |
| Survey | Survey activity |
| Organized key terms in course | Glossary |
Moodle is challenging to learn to use because it is so flexible. Having a beginner focus on using forums exclusively can allow someone to get up and running in a short period of time.
Creating a Forum
To create a forum you need to determine what the purpose of the forum is so that you can adjust the options accordingly. Let’s say you are new to Moodle and you want your students to upload an assignment to a forum so you can mark them. Below are the steps.

2. In the next screen, you need to give the forum a name and a description. The description is where you can place instructions or other information to complete the task. Below is a picture

3. You now need to indicate what type of forum you are using. If you click on the ? near “forum type” in Moodle it will explain each of the type of forums that are available. I will not repeat the explanation but I will provide suggestions on when to use each.
We are going to pick “simple discussion”
4. The next three columns “attachment and word count”, “subscriptions” and “post threshold for blocking” are self-explanatory. You can determine the size of the file to upload and determining if students have to be aware of the activity in the forum The blocking feature is useful for students who dominate a discussion or are argumentative. Below is a picture of the options in our example.

5. The next two settings work together. The “grade” section allows you to determine where to place this activity in the gradebook. This assumes that you have setup the gradebook. You can also set a minimum score to pass if you want but this is optional.
The “ratings” section allows you to setup how you will mark the assignments. You can set the. These options have been discussed previously. The only thing new is the “aggregate” option. Moodle explains this to you. Remember however that the purpose of our forum is uploading of an assignment. As such, when you read the assignment you will put the grade in the forum. The picture below is the settings for our example.

The rest of the settings are not related to our particular task. So you can click “Save and return to course”
After Student Submits
When a student submits you will see the following on the course home page

Hopefully, you can see in small print “1 unread post”. Click on this and see the following
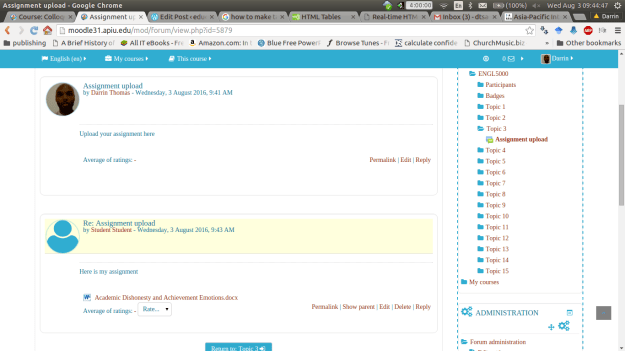
Click on the uploaded assignment and then you can rate the assignment using the drop down box “average of ratings”. The current score is out of a 100 points. After marking click “return”.
You can check to see if the grade was recorded by going to the gradebook.
Conclusion
This post provide practical advice for using forums. How you use forums is only limited to your creativity. Forums are particular useful for beginners as they can complete most Moodle task without mastery of the other modules. However, once you are comfortable with forums you should expand into other tools to further benefit your students.
As with all the features in Moodle, there are many different ways to mark an assignment. In this post we will explain several different approaches that can be taken to marking an assignment in Moodle. For information on setting up an assignment see the post on how to do this.
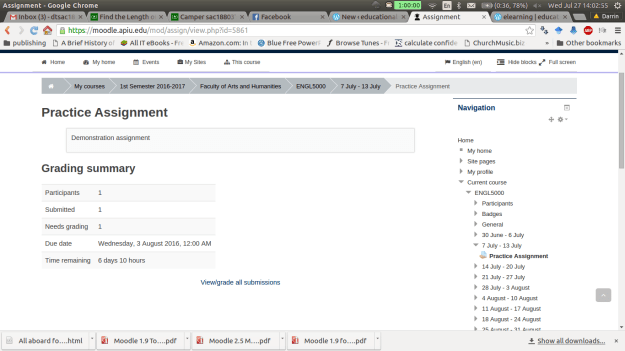
Below is a screen shot of a demo class for this post. To beginning marking an assignment, you need to click on the assignment while in the role of a teacher.
After clicking on the assignment you will see a
Underneath all this information is a link for viewing submissions and you need to click on this. Below is a visual of this.
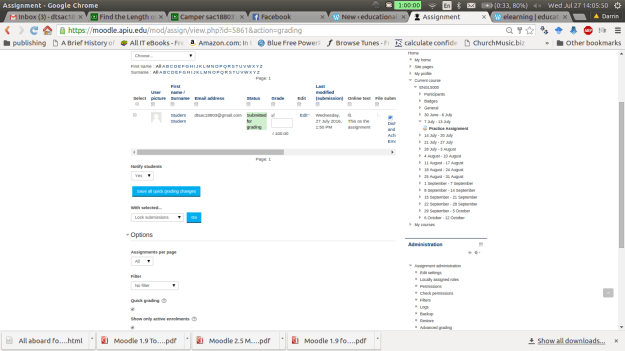
On the next page there is a lot of information. For “grading action” we don’t want to change this option for now. The next section has the names of the students who have submitted the assignment. The “grade” box allows you to submit a numerical grade for the assignment. The “online text” box is only available if you want the students to type a response into Moodle. The “file submission” link allows you to download any attachments the students uploaded. If any comments have been made by the student or someone else you can see those in the “comments” section. The “feedback comments” allows you to inform the student privately how they did on the assignment.
The other options are self-explanatory. Please note that this example uses the quick grading option which is useful if you are the only one marking assignments in the class. Below is a visual of this page.
Once you put in a score and at feedback (feedback is optional). You must click on “save all quick grading changes”. The student now has a grade with feedback on the assignment. As the teacher, you can view the students overall grade by going to the “grading action” drop down menu and clicking on “View gradebook” You will see the following.

You can also change grades here by clicking on the assignment. This will take you “grading summary page” which is the second screenshot in this post. If you click on the pencil you can override an existing grade as shown in the screen below. It will take you to the following screen.

Click on override and you can change the grade or feedback. Click on exclude and the assignment will not be a part of the final grade.
Conclusion
In this post we explored some of the options for grading assignments in Moodle. This is not an inherently technical task but you should be aware of the different ways that it can be done to avoiding becoming confused when trying to use Moodle.
In this post, we are going to take a closer look at setting up the gradebook in Moodle. In particular we are going to learn how to setup categories and graded items in. For many, the gradebook in Moodle is very confusing and hard to understand. However, with some basic explanation the gradebook can become understandable and actually highly valuable.
Finding the Setup Page
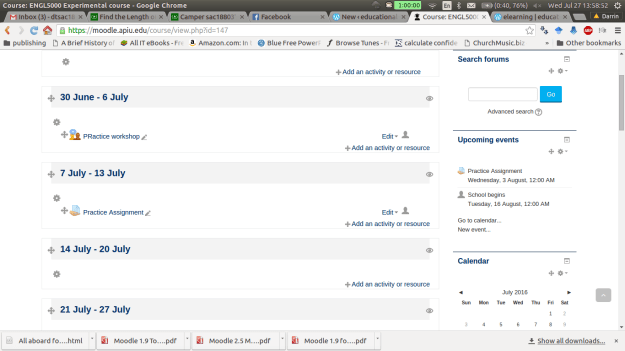
After logging into Moodle and selecting a course in which you are the teacher, you need to do the following.

The folder “ENGL 5000 Experimental course” is the name of the class that I am using. Your folder should have the name of your class in this place. When you create categories and grade items they should all be inside this folder.
Making Categories
It makes sense to create categories first so that we have a place to put various graded items. How you setup the categories is up to you. One thing to keep in mind is that you can create sub-categories, sub-sub categories, etc. This can get really confusing so it is suggested that you only make main categories for simplicity sake unless there is a compelling reason not to do this. In this example, we will create 4 main categories and they are
To make a category click on “Add category” and you will see the following.

Repeat what we did for the “classwork” category for each of the other categories in the example. Below are screenshots of the categories
QUIZZES Category

TEST CATEGORY

FINAL CATEGORY

If everything went well you should see the following on the setup page.

Notice how the class is now worth 100 points. You can make your categories worth whatever you want. However, it becomes difficult to interpret the scores when you do anything. As educators, we are already use to a 100 point system so you may as well use that in Moodle as well even though you have the flexibility to make it whatever you want.
There is one more step we need to take in order to make sure the gradebook calculates grades correctly. You may have noticed that each of our categories are worth a different number of points. Therefore, we must tell Moodle to weigh these categories differently. Otherwise the results of each category will have the same weight on the overall grade. To fix this problem do the following.
You should see the following

Notice in the course total that it now says “simple weighted mean of grades”.
For adding graded items, you do the following
Below is an example of a quiz I put in the quiz category. This is what the setup page should look like if this is down correctly

As you can see, quiz 1 is worth ten points. You may wonder how quiz 1 can be worth 10 points when the entire category is only worth 20. Remember, Moodle use statistics to condense the score of the quiz to fit within the 20 points of the category.
Conclusion
This post exposed you to the basics of setting up categories and graded items in Moodle. The main problem with the gradebook is the flexibility it provides. With some sort of a predefined criteria it is easy to get confused in using it. However, with the information provided here, you now have a foundation for using the Moodle gradebook.
In this post, we will explore how to setup an assignment in Moodle. As with most features in Moodle, how to setup assignments comes with an endless array of options and ways that can become exceedingly confusing for people. As such, we will not look at all of the options but rather try to look at the basic steps need to complete this process.

2.Select the “Assignment” button and click “add” and you should then see the following

3. You need to type a name for the assignment in the “assignment name” box as well as a brief description of the assignment in the “description” box. These are required.
If you look closely at the many different options you will see little question marks in many places. Clicking on these will give you a brief explanation of what the feature does. This is important to know as there are too many features to explain them all clearly.
Explanation of the Various Sections
Additional Files. This section allows you to upload files the students may need to complete the assignment. It is shown in the picture above.
Availability and Submission Types. Availability allows you to setup time frame in which the assignment can be completed. The submission type allows you to determine how the students can submit the assignments. Below is a visual of these two sections.

Feedback Type and Submission Settings. The feedback type is how you can communicate with students about their grade for the assignment. Submission settings allows you to use one of several options for allowing students to turn in their work through Moodle. Below is a picture of what these sections look like.

Group Submission and Notifications. Group submission is useful when a team of students submit something together. Notification settings provide options for how Moodle communicates with teachers and students when assignment are submitted and marked. Both of these settings are shown below.

Grade Settings. Grade settings provides options for how papers are marked. Again, further details, you need to click on the question marks for additional information. Below is a screenshot of the grade options.

The final section is common module sections. These can mostly be ignored unless you are working with students in groups. After determining your settings you need to click either “save and return to course” or “save and display”.
Conclusion
There really is no simple way to explain when to use the various features available when using assignments. What to use depends on such factors as the needs of the students, the learning environment, the goals and objectives of the course, etc. As such, for you as a teacher the best advice to be given is to look at the context in which you are teaching and try to find the right combinations of options to use for that particular assignment.
Rubrics are a systematic way of grading assignments. They can be holistic or analytical in nature.
A holistic rubric looks at the overall assignment and provides one over-arching criterion with various levels of performance. For example, a paper can be jduge on overall writing by making the categories of excellent, good, average, and poor. Each of these ratings comes with a brief paragraph that describes the level of performance. This is a way to provide some feedback with having to spend a large amount of time marking.
An analytical rubric breaks the assignment done into components and provides a rating for each component. For a research paper a teacher might include the components of grammar, formatting, word count, etc. and each of these components would have a score attached to it.
In this post, we are going to develop an analytical rubric for an assignment in Moodle. The only activity that allows for rubrics is “assignments” so we will make a rubric for this activity.
Making a Rubric
Below is a picture of step 4

5. Scroll down to the “grades” tab
6. Set maximum number of points to “30”
7. Change the grading method to “rubric” and leave the rest of the settings the same
Below is a picture of steps 5-7

8. Click “save and display” and you will see the following.

9. Click on “define new grading form from scratch” The other option only works if there are existing rubrics.
10. In the next screen, you need to complete the following

As you can see, rubric is highly flexible. Each level can be worth a different number of points ad you can have a different number of levels for each criterion. The only rule is to make sure that the total points for the rubric are the same as those you set in the points option in assignment settings.
11. Once finished, click”save rubric and make it ready” You should see the following

We can now use our rubric and I will demonstrate this with an example student. You may not be able to follow along if your course does not have any students.

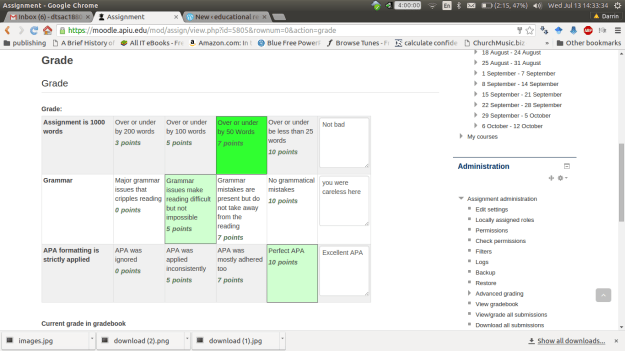
3. I can now pick the score I want to give. Provide comments for each criteria and provide overall comments in the “Feedback” section. Below are pictures of the rubric and feedback.

4. Now, I click “save changes” On the next screen I click “continue”You should now see the grade page again with the score and feedback you provided. Below is a visual of this

Conclusion
This post provided step-by-step instruction on using rubrics in Moodle. Rubrics provide quick feedback to a student in terms of there performance on specific action-based task.
Scales are used in Moodle to grade individual assignments. Once created, scales can be used for any assignment if desired.
The difference between scales and letter grades is that letter grades can be used for individual assignments and or for determining the overall grade of a course. Scales can only be used for assignments and the results of a using a scale are used to calculate the final grade of a course.
In this post, we will look at how to make a scale in Moodle
Creating a Scale

There are two categories of scales. The first is “custom scales” these are scales that you make as the teacher. The second category is “standard scales” these are made by your site administrator are came with Moodle upon installation.
3. Now, click on “add a new scale” to begin making your own scale. You should see a screen similar to the following.

This is mostly self-explanatory. You need to give the scale a name in the “name” section. The “standard scale” box should only be checked if you want the scale to available all over the Moodle site.
The “scale” section is a little trickier. In this section, we will put all of the levels of our scale. You put the lowest ranking comment first and go in increasing order. We are going to make a scale with three levels as shown below.
Poor, Okay, Excellent
You can copy the text above into the “scale” section
The description section can be left blank. This is useful for telling people or reminding yourself of the traits of the scale and its purpose. Once you provide all the necessary information click “save changes.” Below is a picture of the completed scale with all of the necessary information.

The scale we made is a three point scale. A mark of poor = 1, okay = 2, and excellent = 3. When using the scale, students will see the word of the scale while the gradebook would record the word and points for calculation.
4. Using the Scale
Whenever you make any kind of assignment in Moodle, all you have to do to use the scale is to change the option “grade type” and set it to “scale” as shown in the example below.

All other features can be left only. In a future post, we will look at greater detail how to created assignments.
Conclusion
This post provided explanation into creating scales in Moodle. Scales provide a way to give richer feedback than just giving points and or a letter grade. As such, a combination of points and scale grades can provide students with a multi-faceted feedback experience.
Moodle is an open-source learning management system that is used by many different institutions within and outside of education. The challenge with Moodle is not a lack of features but rather how incredible flexible it is. What you can do with Moodle is only limited by your imagination. This problem is almost insurmountable for people who like rigid and fixed systems and options.
The overall flexible found in the Moodle system is also a part of the gradebook found within Moodle. A common complaint is that the gradebook is too complicated. In reality, the complexity of the gradebook is its flexibility that it possesses. Without clear goals and objectives going in, the gradebook is impossible to use.
In this post, we will begin to explore some of the features of the Moodle gradebook before moving to other features of this Learning Management System.
Types of Grades
There are three ways that grades can be recording in the gradebook in Moodle
We will look briefly at each
Numeric Grade
The default option in Moodle is a numeric grading. This option involves giving points for the completion of an assignment. The default number of points is 100 but this can be changed as necessary. Below is a screenshot of an assignment that is using a numeric grade. Notice how the grade type is set to “value” and the maximum grade is set to 100 points.

Letter Grade
A letter grade is a letter, word or phrase that serves as a substitute for numerical grade. The letter acts like a number and the letter or word is converted into a number for calculating grades. Below is an example of letter grade system.

Below are directions for creating a letter grade system in Moodle 2.8


5. You should no see a new screen with the current grades along with their cutoff points. In this screen click on the “override site defaults” so we can set our own grade system.

6. We will now set our own sample grade system below are the details
Below is what this looks like in Moodle

After clicking on “save changes”, here is what the grade systems looks when it is complete

Whenever we want to see the final grades of a course. This scale will be used and will be displayed as the final grade. However, if we want to grade individual assignments with different grading systems we will need to make a scale. In a future post, we will look at how to create scales for grading.
Conclusion
Moodle offers a huge array of options in terms of learning and instruction. In addition, Moodle offers many different options in regards to grading that can by confusing. However, with clear goals it is possible to achieve what you want from this system.


